Showing posts with label Saw it Pinned it Did it. Show all posts

Friday, June 21, 2013

The Monster Me!

This week is short week for me, I had Monday off for my cabin adventure, and then I had Friday off for a camping trip that got canceled so now it's just a personal day.

I decided that the kids and I should still have a theme and since Monster's University is coming out this weekend I decided the theme would be Monsters. The kids mom is going to take them to see this movie, and I plan on going and seeing it by myself or with a few willing friends!

Anyways, with the Monsters theme I looked up plenty of crafts on Pinterest.(Funny thing, every week with each new theme my pinterest board blows up with me pinning activities that go with that, it cracks me up, you can follow me here) Well I found a lot of stuff I liked but then something came to my mind and I decided it would be the best craft ever!

I call it Monster Me!

Do you remember when you were a kid and you went outside with chalk and you traced yourself and then spent the entire afternoon coloring it in? No? Well I did. Every single day I was allowed to play with chalk and it was my favorite thing ever.

So off to JoAnns we went to get the supplies, which wasn't much since we had a lot at home.

Supplies Needed:
*Large Roll of White Paper (You are fitting entire children on them)
*Scissors
*Tape
*Pencils
*Crayons
*Markers
*Squiggly Eyes
*Glue
*Other Odds and Ends (Tissue Paper, Feathers, Stickers, etc.)
*Imaginative Children
*Veggie Tale Pandora Radio Station
 
Ok, the last two are optional, but it makes the project way more fun!
 
First things first, lay that white paper roll out and have a child lay their whole body on the paper.
 

Then taking the pencil trace around the child's entire body. It doesn't have to be perfect and I included dresses and Einstein hair (as I call it).


After everyone has been traced cut out each piece of paper with the body on it. (You are not actually cutting the shape of the body quite yet!)
 
Find some open place on a floor somewhere and tape down the corners and any unruly sides that attempt to thwart your plan.
 
After the papers are taped down give the kids, pencils, crayons, or markers (or all 3!) and have them decorate their body if they were a Monster!


At this point there are so many giggles and "Hey look at what I'm doing" going on that it's a lot of fun. I gave my kids free range and told them that they could take their time and make their Monster Me however they wanted to.
 
After the kids have colored everything give them squiggly eyes and all the other odds and ends and some glue and let them accessories their Monster Me.


After everything has sat and dried have the kids cut out their Monster Me and display them anywhere in the house for all to see!


Then I had the kids lay next their Monster Me and take a picture, they came out sooo good.

I introduce to you Mr. Scare Bear, Charlotte, and Dob from top to bottom!


I have created this Pin so you can add to your board and share with others!
Jenny  

Friday, May 10, 2013

High Five for Friday!

How is it already Friday, I am not complaining in the one bit but this week seemed to fly by!

Today W and I are hitting up the zoo finally! The last time we attempted to go our efforts were thwarted by a car on fire on the 400 and then again by awful rainy weather, today the high is 78 and the roads look good!

I am again linking up with Laure for High Five For Friday!

 photo H54Fbutton-triangle_zps678b65ba.jpg
 
1. Look at these three goobers, I was sitting at the end of the hallway folding laundry and these guys came out and said "Jenny we need to hatch a sneaky plan, are you in?" I just about died laughing and then made them stop to take a picture. I love getting to spend every day with them.
 
 
2. I completed Week 3 Day 3 of my Ease into 5K, it was a nice day and I love that my running pace is at about a 11 and half minute mile. I am definitely not the fastest but am getting there slowly but surely. I start week 4 this week and am super nervous lots of longer running times but I am sure I can make it!

 
3. I made a tutorial for these beauties for my Saw It, Pinned It, Did It after I could not find one to follow. So click here and see how to make these, I am sure all the little girls in your life will love them, mine sure do.


4. If you have read my blog for any amount of time you will hear me talk a lot about the fact that I have the best job in the world. Well my boss drives a pretty cool car and while most of the time I get to drive the nanny van around sometimes we have to meet for softball games and switch car so I can get back to the house to get my car. Well last night he pulled up to the game and came over to me and simply said "I put the top down for you" oh yes thank you! I had a great time. Once I got to the house though I realized I had forgotten my own keys in the van so I had to go back to get them, could have been way worse. 


5. I pulled this off of my phone this morning. Oh yes, I leave in about 9 hours to head to the beach with my friend Kirsten for our mini beach vacation. I am really excited. We are headed to St Augustine which is where I went to college and still have a lot of friends. I am so blessed that a family I use to nanny for has an extra place for us to stay, thanks again Jane :) (She reads my blog often and we talk quite a bit, I love staying connected with families I have worked for.)

 
I decided to leave my laptop at home in order to allow me to really take this whole relaxation thing to the next level. I am all about technology but I think I need to put it down for a while. You can bet though that I will still be Instagramming often, go ahead and follow me at @jennylynn4390
 
Jenny


Thursday, May 9, 2013

Have a Spot of Tea?

W and I are spending the day at home together having another pajama day and watching many movies! So Spy Kids 3 is on and I decided to do a little blog reading when I logged onto my blogger I saw that Saw It, Pinned It, Did it was back and I cannot be more excited.
I was super bummed when I learned there was going to be a break because I was one week away from posting about something I was so proud. I posted this picture on Instagram (@jennylynn4390) and My Facebook and got so much feedback about how much they loved it.


Aren't these just not the cutest, I certainly think so! I mean what little girl doesn't love to play tea especially with pretend tea bags.
 
Originally I found this pin here.
 
 
After clicking on the pin and realizing it was in French, I google translated the page and then clicked around and was unable to find a tutorial on how to do these adorable bags, so I decided to take matters in my own hands. Here is my new tutorial on how to make these, you can find the new pin here to put on your Pinterest Board, and spread the word on these beauties.


All you need is some left over fabric, very thin batting, yarn, this template here and a handy dandy sewing machine.


You use a very minimal amount of fabric so it can just be left overs like these ones here.

First you need to take the template and out of each fabric cut two bag shapes, and two squares.
From the batting you just need to cut one bag and one square.


Cut a piece of string about 6 inches long, or however long you want it to be.

Take the tea bags and sandwich the batting and the yarn in between the two fabric pieces.


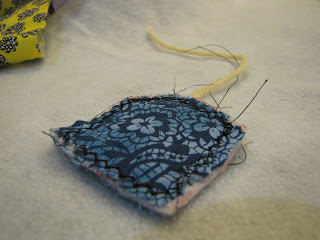
Then I (carefully) put it in place on the sewing machine and set it on the zig zag stitch pattern or letter B on my sewing machine. I sew the top portion first to secure the yarn and then go around the entire thing about 2-3 times.
 
 
When you take it off of the machine it looks a little rough - see below.


Use some small trimming fabric scissors to clean it up. I get as close to the stitch as I can without cutting the stitch and thus ruining all the hard work. Once trimmed up it looks a lot better, see below for result.

 
Next take the other end of the yarn that is attached to the tea bag and place squares of a different (or same) fabric and batting like so.


Then take this and place it on the sewing machine and sew around all the sides about 3 times and repeat with the trimming to make it look nice and clean.
 
 
After doing a couple more you end up with a cute set of play tea bags and in my case, one happy happy happy  (Duck Dynasty anyone? Yes!) little girl.


Thanks again Stephanie for hosting this fantastic link up! Make sure you click over and see some of the other amazing projects!


Jenny

Thursday, April 11, 2013

Bubble Snake!

The nice spring weather has finally decided to grace us with its presence and we are elated. Except for the fact that it went form 30 to 80 in one week and I have 3 very pale children who require gobs of sunscreen any time we decide to set foot out of this house. (No lie, I cannot even count how many cans and face sticks we go through each summer) The good thing is, that when S was seeing a dermatologist for a wart issue he told her mom that she has some of the best skin he has ever seen and that we must be taking great care of it! Score 1 for the nanny!

Anyways with the nice weather and the fact that we have dropped some our after school activities (thank goodness, we were becoming super crazy busy!) I am coming up new ways to keep the kids entertained. On the way to taking W to school, I asked him what he would think about doing bubbles in the afternoon. He was all for it, but I figured it needed to be something that wasn't just the regular old bubbles, even though there is nothing wrong with simple bubbles. I like to stay creative and new and exciting, it's one thing the kids say they love about me. I am very happy to oblige.

I knew that I had seen something about bubble snakes on Pinterest so I took my quest there and found this Pin. I clicked on it and knew that this is what we were going to be doing today. As well as the tutorial on how to make the bubble snake maker, there is a link to a Bubble Refill Station, which I have always wanted to make. We go through bubbles like it is no ones business, seriously. They can get to be really expensive too, so I decided it would be good if we had our own bubbles.

So after the oven repair man was done telling me a lot of stuff I didn't understand and then calling my boss to have him talk to him, I piled the kids in the car and we headed off to Target to get all of our supplies. I let the kids choose the container they wanted to put the bubbles in and luckily since it is spring time there are a TON to choose from right now. We used this simple recipe, 2 1/2 cups water, 1/2 cup corn syrup, and 1/2 cup of dawn dish soap. You put the corn syrup and water in a bowl and heat in microwave for 3 minutes and then stir in the dish soap. We quadrupled the recipe because we had that much corn syrup and dish soap and wanted to use most of it to get the most bubbles possible. After all the mixing we put it in our refill station and set it up outside on the kids picnic table.

 
Having three kids I know the importance of making sure that everyone has their own thing or it can get real serious real fast. I bought three pie tins to old the bubbles and gave each child one. (My goal today is to write their name in it so there is no confusion at all!) Inside I emptied and cut the bottoms off of three water bottles while I had the children go and get a wash cloth for each of them. Once they brought the wash cloths I took a rubber band and secured it over the opening on the bottom of the bottle. We took the snake makers outside and I gave a brief overview on how to properly use the maker and the importance of breathing out into the maker and not in as to avoid bubbles coming in their mouth (only 1 out of 3 children ended up breathing in bubbles, I'll say that's an ok record, she recovered and was back out in an instant!). Then they were off and boy did they have fun!


(S's face cracks me up, she can never just have a normal face!)
 
They played with them for a good 30 minutes before bubbles started to get everywhere and people were crying and it was definitely time to clean up and head inside. The girls spent most of the time plotting about their American Girl dolls and whether or not W would be a good babysitter, turns out he wasn't because the doll broke her leg (I was the Dr, so I got to diagnose and put a cast on her). S scolded W and told him "W, We told you not to put children in the chair on an empty stomach, that's how they fall off!" who knew!?!?
 

The only thing I would recommend it making sure that you cut the wash cloth down to a circle so that all the extras don't just hang out there because we ended up getting those soaked and it became real messy real quick.

 
Another fantastic link up with Stephanie at BEAUtiful mess